Detailed Repairs
Aluminium Boat Repair
Aluminium Boat Repair with G/flex® 650
Step by Step Instructions show you how to use G/flex 650 to repair the most common problems with aluminium boats and canoes:
- Leaking Seams and Rivets
- Patching Holes in Aluminium Hulls
- Repairing Pitted and Pin-holed Surfaces
G/flex 650 is a marine-grade adhesive that can be accurately mixed in small batches with a simple 1:1 mix ratio. It has the advantage of a long open working time and a relatively short cure time, and has been designed for permanent, waterproof, structural bonding.
Fixing Leaking Seams and Rivets
As aluminium boats age the accumulated wear and tear on its riveted joints can take a toll on the rivets themselves. Rivets can stretch and eventually loosen, leaving gaps and leaks. Severely damaged seams may require new rivets in combination with G/flex Epoxy. Most leaks can be easily repaired with this kit and the following:
- Wire brush
- Propane torch or heat gun
- Determine the exact locations of leaks by putting the boat in the water or by filling the boat part way with water to see where it leaks.
- Mark the leak locations with an indelible pen.
- Allow the boat to dry.
- Roll the hull over if possible for easy access to leaking sections.
- Abrade along the seams and rivets with a wire brush to remove any debris and expose bright metal. A wire brush attachment on drill will make the job easier.
- Dispense equal volumes of G/flex 650 resin and hardener into a mixing cup and stir thoroughly with the mixing stick (1). Transfer the mixed G/flex epoxy to the plastic syringe. (It is quicker to fill the syringe by removing the plunger and pouring the epoxy into top, especially in cooler temperatures. You should also find it easier to extrude the epoxy in cooler temperatures if you trim the syringe tip back to about a 189 cm opening.
- Use a propane torch or heat gun to boil off any remaining water under the rivets and in the seams in 31cm to 46cm long sections or areas (2).
- Apply a continuous bead of G/flex, using the syringe, along the heated seam and around the rivet heads. The epoxy should thin out and flow into the smallest crevices (3).
- Heat the metal with a torch or heat gun as necessary to thin the epoxy to a water-like consistency and to move it along and penetrate deeply into seams and under rivets. Continued moderate heating will cause the epoxy to gel and cure quickly. Do not heat the epoxy to the point where it discolours or begins to smoke.When you are satisfied that epoxy has penetrated all of the gaps move on to the next section. Repeat steps 6 though 9 until all leaks are repaired.
Filling larger gaps in seams and rivets
If new rivets are not available to draw together large gaps, it is possible to successfully repair larger gaps in seams and loose rivets by completing the previous 8 steps and following with these additional steps:
- Mix a batch of G/flex 650 Epoxy as described earlier. Stir in 403 Microfibre Blend Powder to thicken the mixture to a “mayonnaise” consistency.
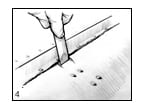
- Force the thickened epoxy mixture into the seam gaps or under the leaky rivets with a putty knife or mixing stick while the initial coat of G/flex 650 is still uncured (4). You may also use the syringe filled with the thickened mixture to force epoxy into the gaps. Trim the tip back as necessary for the thicker material.
- Keep forcing the mixture through the seam until you see epoxy on the other side of the hull. Thickened epoxy bridges gaps and stays in the seams while it cures.
- Wipe uncured excess epoxy from both sides while uncured with paper towel. Use solvent (lacquer thinner or acetone) sparingly if needed to remove stubborn epoxy. Avoid washing epoxy out of the seams or dissolving paint.
- Allow the epoxy to cure overnight at 65°F (18°C) or warmer before using the boat. You can speed curing by applying moderate heat.
- Apply a spray paint to match the aluminium or the existing paint if desired.
Patching holes in aluminium hulls
It is not uncommon for a thin-gauged aluminium hull skin to be punctured or torn by some unseen underwater object or unforeseen trailering mishap. If you don’t have the skills or the patience for welding or riveting aluminium you can still affect a sturdy repair with G/flex 650 epoxy and the following items not included in the kit:
- XK0400 400gm Double-bias (+/- 45°) Fiberglass Fabric 0.762m x 0.762m
- WEST SYSTEM 808 Flexible Rubber Squeegee
- WEST SYSTEM 803 Glue Brush
- 80-grit sandpaper
These items along with the kit materials will allow you to repair a damaged area up to 15cm x 15cm as follows:
- Hammer the torn aluminium back as close as possible to the original hull shape. Cut away torn edges as necessary for the metal to lie smooth.
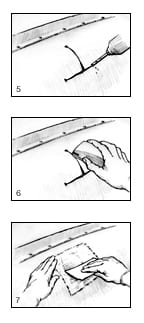
- Drill a 4.5cm diameter hole at the ends of each crack to prevent further cracking (5).
- Smooth edges and rough areas with 80-grit sandpaper.
- Abrade away any remaining paint in the area at least 5cm larger than the hole on the inside and outside of the hull (6). You can improve adhesion to aluminium by treating with an aluminium etch – follow the manufacturer’s instructions.
- Cut a piece of XK0400 400gm fibreglass cloth 5cm larger on all sides than the hole to match the abraded or treated area.
- Dispense equal volumes of G/flex 650 Resin and Hardener into the mixing cup and stir thoroughly with the mixing stick.
- Place the fibreglass on a piece of plastic. Using a disposable brush, apply the mixed epoxy to the fabric until it is saturated.
- Position the wet fibreglass over the hole on the outside of the hull with 5cm of fabric extending beyond all sides of the hole. Use a plastic spreader to smooth the fabric against the surface while wiping off excess epoxy (7).
- Mix a batch of G/flex 650 and stir in enough 413 Microfibre Blend Powder to thicken the mixture to a “mayonnaise” consistency.
- Apply the thickened mixture to the repair area on the inside of the hull, filling the gaps in the metal and leaving a thin layer of the thickened mixture over the entire repair area.
- Cut a piece of XK0400 400gm fibreglass cloth 5cm larger on all sides than the hole. Cut a second piece 2.5cm larger on each side than the hole. Then cut a third piece 0.6cm larger on each side than the hole.
- Dispense equal volumes of G/flex 650 Resin and Hardener into the mixing cup and stir thoroughly with the mixing stick.
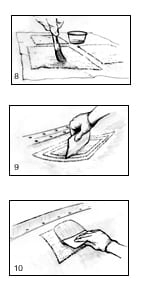
- Place the three pieces of fibreglass on a piece of plastic. Using a disposable brush, apply the mixed epoxy to the pieces of fabric until they are saturated (8).
- Position the largest piece of wet fibreglass over the hole on the inside of the hull with 5cm of fabric extending beyond all sides of the hole. Position the next biggest piece centred over the first. Then position the smallest piece centred over the previous piece. Using a plastic spreader, smooth all of the fabric against the surface, smooth all of the fabric against the surface, eliminate trapped air and wipe off excess epoxy (9). Check the outside of the hull to make sure the patch was not pushed away from the surface. Smooth it with the spreader as necessary.
- When both sides of the patch have cured to a duct tape-like tackiness, mix a batch of G/flex 650 and stir in enough 403 Microfibre Blend Powder to thicken the mixture to a “mayonnaise” consistency. Using a plastic spreader, apply this mixture over the patch, filling and smoothing the uneven edges and blending both sides of the patch into the undamaged area around it (10). Allow the patch to cure overnight.
- Wipe the area with water and sand the epoxy smooth and dull before applying a final finish. (If you are not satisfied with the smoothness of the patch repeat steps 15 and 16 before continuing with the final finish.)
- Apply a finish coating to protect the epoxy from the effects of sunlight. If the hull is painted, you can coat the repaired area with a marine or automotive primer and matching paint. Follow paint manufacturers recommendations.
Note: Wherever fibreglass fabric is called, you may use more layers of lighter weight fabric that totals the same weight. For example, to equal 3 layers of 400gm fabric, you may use 6 layers of 200gm fabric to total 1200gm. Always make top layers progressively smaller than the bottom layer. Centre each layer over the previous layer with the edge of each layer stepped back from the edge of the layer below it.
Repairing pitted or pin holed surfaces
Extensive corrosion or pinhole damage should be cutaway with and replaced with new material by a repair professional. But as long as the damage is not too severe, you may reinforce the area with G/flex 650 epoxy and the following items not included in the kit:
- XK0400 400gm Fibreglass Fabric (0.762m x 0.762m)
- WEST SYSTEM 808 Flexible Rubber Squeegee
- WEST SYSTEM 803 Glue Brush (Metal handle brush)
- 80-grit sandpaper
These items will allow you to repair a damaged area up to 30.5cm x 30.5cm as follows:
- Remove loose material with a wire brush and abrade the area with 80-grit sandpaper.
- Treat the surface of damaged area with a two step aluminium etch – follow the manufacturer’s instructions. (If a two-step etch is not available, abrade with 80-grit sandpaper immediately after applying a coat of G/flex 650 Epoxy. This removes the weak oxidation layer and exposes clean metal to improve adhesion.)
- Dispense equal volumes of G/flex 650 Resin and Hardener into the mixing cup and stir thoroughly with the mixing stick. Then stir in enough 413 Microfibre Blend Powder to thicken the mixture to a “mayonnaise” consistency.
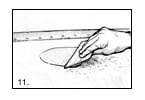
Note: Wherever fibreglass fabric is called for, you may use more layers of lighter weight fabric that totals the same weight. For example, to equal 3 layers of 400gm fabric, you may use 6 layers of 200gm fabric to total 1200gm. Always make top layers progressively smaller than the bottom layer. Centre each layer over the previous layer with the edge of each layer stepped back from the edge of layer below it. - Force this thickened G/flex 650 into the pinholes, filling the pores, using plastic spreader or putty knife (11). Spread it smoothly to leave a thin, even layer allow to cure overnight.
Proceed to step 10 if damage is minimal. If the damage area appears to be thin or porous, apply a layer of fibreglass fabric for reinforcing as follows: - Cut a piece of XK0400 400gm fibreglass fabric slightly larger than the damaged area.
- Dispense equal volumes of G/flex 650 Resin and Hardener into the mixing cup and stir thoroughly with the mixing stick.
- Place the fabric on a piece of plastic. Using a disposable brush, apply the mixed epoxy to the fabric until it is saturated.
- Position the wet fibreglass over the damaged area. Use a plastic spreader to smooth the fabric against the surface while wiping off excess epoxy.
- When the fibreglass patch has cured to a duct tape-like tackiness, mix a batch of G/flex 650 and stir in enough 413 Microfibre Blend Powder to thicken the mixture to a “mayonnaise” consistency. Using a plastic spreader to apply this mixture over the patch and smooth out the edges of the fabric and blend the patch into the undamaged area around it.
- Wipe the area with water and sand the epoxy smooth and dull before applying a final finish.If you are not satisfied with the smoothness of the patch repeat steps 9 and 10 before continuing as follows:
- Apply a finish coating to protect the epoxy from the UV effects of sunlight. If the hull is painted, you can coat the repaired area with a marine primer and matching paint or an automotive primer and paint. Follow paint manufacturers recommendations.


